Calcium: The Fixer of All Boo-Boos in Growing Garlic
Garlic (Allium sativum) is a staple in gardens worldwide, prized for its pungent flavor and undeniable health benefits. But like any plant, it can face "boo-boos"—those nagging issues that stunt growth, invite diseases, or reduce yields. Let's talk about calcium (Ca2+), often hailed as the unsung hero in plant nutrition. This essential nutrient acts as a structural backbone, disease fighter, and growth enhancer, particularly for your beloved garlic crop. In this article, we'll dive into why calcium is important, backed by powerful science, real-world examples, and a strong emphasis on why soil testing is your ultimate gardening superpower.
Calcium: The Ultimate Bodyguard
Think of calcium as the ultimate structural engineer in both our bodies and in your garden. For humans, it acts like the cement that forms the hydroxyapatite crystals in your bones, making them strong enough to support your entire frame. For your garlic, it does the exact same job, but on a cellular level: it strengthens the tiny cell walls inside the plant. This structural integrity is crucial because it helps the garlic leaves and developing bulb resist splitting, makes them tougher against diseases and pests, and ensures the mature bulb stores better after harvest.
The Science Behind Calcium: The Element of Strength
Calcium is essential to plants, acting as both a structural builder and an internal alarm system. In its role as a builder, the calcium ion (Ca2+) is crucial for forming strong cell walls. It works like a super-glue, cross-linking with pectin molecules in the middle lamella (the "glue" between cells) to create rigid structures called calcium pectate, which provides necessary strength, maintains internal water pressure (turgor), and helps the plant resist stress. As an alarm system, calcium maintains an extremely low concentration in the cell's fluid (cytosol) until the plant senses danger like drought or disease. When stress hits, specific channels open, causing a rapid Ca2+ "spike." This sudden rise in calcium acts as a secondary messenger, being quickly decoded by proteins that then launch the plant's defense mechanisms, regulating enzyme activity and coordinating with hormones to manage the crisis.
Is Calcium Part of NPK ?
Calcium is not a part of the NPK formulation, which specifically refers to the three primary macronutrients essential for plant growth: nitrogen (N), phosphorus (P), and potassium (K). These nutrients are the cornerstone of most commercial fertilizers, as they play critical roles in plant development—nitrogen supports leafy growth and photosynthesis, phosphorus aids in root development and energy transfer, and potassium enhances overall plant vigor, water regulation, and disease resistance. The NPK ratio, typically displayed on fertilizer labels (e.g., 10-10-10), indicates the percentage of each nutrient in the product. Calcium, while also a vital nutrient for plants, is classified as a secondary macronutrient alongside magnesium and sulfur. It is essential for cell wall structure, membrane function, and overall plant stability, helping to prevent issues like blossom-end rot in tomatoes or tip burn in lettuce. Unlike NPK, which are mobile in the plant and soil, calcium is relatively immobile, meaning plants rely on a consistent supply through soil or supplemental applications. While calcium is not included in the NPK designation, it is often present in fertilizers or soil amendments like lime (calcium carbonate) or gypsum (calcium sulfate), which are used to correct soil deficiencies or adjust pH. In summary, although calcium is crucial for plant health, it is distinct from the NPK trio and addressed separately in nutrient management to ensure balanced soil fertility and robust crop growth.
How Much Calcium is Already in Your Soil?
Determining the calcium content in your soil is a critical step in assessing soil fertility and ensuring optimal plant growth, as calcium is essential for cell wall development, nutrient uptake, and preventing deficiencies that cause issues like blossom-end rot or stunted growth. The most accurate method to measure soil calcium levels is through a professional soil test, which involves collecting a representative soil sample from multiple locations in your garden or field, typically from the top 6-12 inches of soil, and sending it to a certified laboratory. These labs use techniques like atomic absorption spectroscopy or inductively coupled plasma analysis to quantify calcium levels, often reporting results in parts per million (ppm) or milligrams per kilogram, alongside recommendations for amendments if levels are deficient (e.g., below 400-1000 ppm for most crops, depending on soil type). Alternatively, for a quick estimate, home soil testing kits are available, though they are less precise and typically measure calcium indirectly through pH or cation exchange capacity (CEC), as calcium availability is closely tied to soil pH—acidic soils (pH below 6) often have lower available calcium, while alkaline soils may have excess. To perform a home test, you mix soil with a reagent solution and compare color changes to a chart, but results may not distinguish between total and plant-available calcium. Additionally, observing plant health can provide clues; symptoms like weak stems, leaf curling, or fruit disorders may indicate calcium deficiency, prompting further testing. For a more comprehensive understanding, labs also assess the calcium-to-magnesium ratio and CEC, as excessive magnesium or potassium can compete with calcium uptake. Regular testing, ideally annually, combined with knowledge of your soil’s texture (sandy soils often have lower calcium than clay soils) and cropping history, helps tailor amendments like lime, gypsum, or calcium-rich fertilizers to maintain optimal levels, typically 65-75% of the soil’s cation exchange sites occupied by calcium for balanced fertility.
Excessive Calcium in Soil (Too Much!)
Effects of Excessive Calcium
Excessive calcium in soil, often resulting from over-application of lime or gypsum, can disrupt nutrient balance and soil chemistry. High calcium levels may:
-
Nutrient Imbalance: Saturate the soil’s cation exchange capacity (CEC), reducing availability of magnesium, potassium, and micronutrients like iron, manganese, and zinc, leading to deficiencies.
-
pH Imbalance: Raise soil pH to alkaline levels (>7.5-8), locking up micronutrients and causing issues like chlorosis or stunted growth.
-
Reduced Microbial Activity: Alter soil pH, inhibiting beneficial microbes that aid nutrient cycling and organic matter decomposition.
-
Soil Structure Issues: In clay soils, cause over-aggregation, reducing water infiltration and root penetration.
Symptoms in Plants
-
Yellowing leaves (chlorosis) due to micronutrient deficiencies.
-
Stunted growth or poor fruit development.
-
Weak root systems or reduced plant vigor.
Management Strategies
-
Soil Testing: Conduct regular soil tests (annually or biannually) to monitor calcium levels, pH, and nutrient ratios. Aim for 65-75% calcium saturation of CEC and a calcium-to-magnesium ratio of 5:1 to 10:1.
-
Avoid Over-Application: Apply calcium amendments like lime or gypsum based on soil test recommendations, considering soil type (sandy vs. clay) and crop needs.
-
Correct Alkaline pH: If pH is too high, apply elemental sulfur or acidifying fertilizers (e.g., ammonium sulfate) to lower pH gradually, following test-based rates.
-
Balance Nutrients: Add magnesium (e.g., Epsom salts) or potassium fertilizers if deficiencies are detected, ensuring balanced nutrient uptake.
-
Monitor Crop Health: Look for deficiency symptoms and adjust amendments to support sensitive crops like blueberries or azaleas, which prefer lower pH.
Preventive Measures
-
Test soil before applying calcium-based amendments.
-
Use precise application rates based on lab recommendations.
-
Rotate crops to prevent nutrient buildup and maintain soil balance.
By carefully managing calcium inputs and monitoring soil conditions, you can prevent the adverse effects of excessive calcium and maintain healthy, productive soil.
The Immobile Challenge
A key scientific and practical challenge with calcium is its immobility within the plant. It is primarily transported from the roots to the shoots via the xylem, driven by transpiration. Once deposited in an older leaf, it cannot be easily remobilized to newer, growing tissues.
-
This immobility explains why deficiency symptoms always appear in young leaves and growing tips first, as these areas are dependent on a constant, fresh supply of Ca2+.
-
Absorption is hindered by factors like:
-
Low Transpiration: High humidity or cool weather reduces water loss, which in turn slows calcium transport.
-
Improper pH: Garlic thrives in a slightly acidic to neutral pH (∼6.0−7.5). Outside this range, calcium availability drops.
-
Antagonistic Ions: High concentrations of competing cations like magnesium (Mg2+) or potassium (K+) can interfere with calcium uptake by the roots.
-
Calcium’s Specific Role in Garlic: Disease Resistance and Quality
For garlic specifically, calcium isn't just about general health; it's a critical factor in bulb quality and defense against the most dreaded "boo-boos." The structural integrity provided by calcium is the plant’s first line of defense. A cell wall rich in calcium pectate is much harder for fungal and bacterial pathogens to penetrate. Research confirms that a shortage of calcium results in a "less ability to resist the infection by plant pathogen." For a crop like garlic, which is susceptible to soil-borne pathogens like white rot (Sclerotium cepivorum) and basal rot (Fusarium species), having strong, calcium-fortified cell walls in the bulb and root plate is vital for field and storage life. Calcium application has been shown to reduce postharvest decay in other fruits and is closely related to firmness, a key factor for good garlic storage.
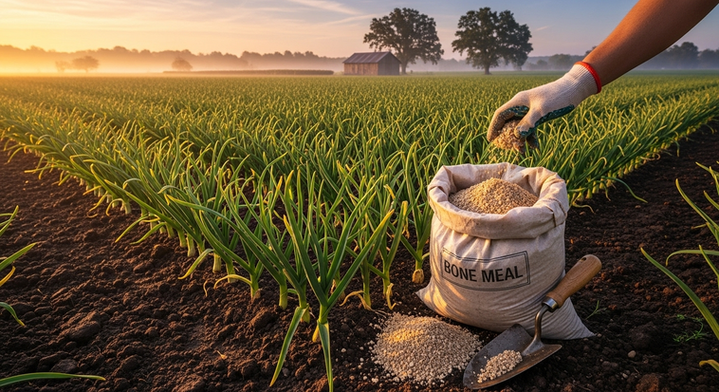
Sources of Calcium
Maintaining adequate calcium levels is crucial for healthy garlic growth, as it strengthens cell walls and helps with disease resistance. The best source for your garden will depend on your soil's current pH level, which should ideally be between 6.0 and 7.0 for garlic. The best way to get calcium to your garlic is to use Bone Meal and Gypsum, as they won't mess up your soil's acidity (pH).
1. Fall Application (Planting Time)
-
Source: Bone Meal (This is organic and slow-release, and it also adds Phosphorus, which is great for bulb size).
-
Purpose: Long-term calcium and phosphorus for strong roots and big bulbs.
-
How to Apply: Add a small amount (about 1 tablespoon) directly into the hole or trench before you plant each garlic clove.
2. Spring Application (Growing Time)
-
Source: Gypsum (This adds fast-acting calcium and sulfur, which garlic needs for flavor and strength).
-
Purpose: A quick boost of calcium and Sulfur for strong, healthy leaves in the spring.
-
How to Apply: Lightly sprinkle the powder over the top of the soil once the garlic shoots are a few inches tall (in early spring). Rake it in gently or water it well.
Simple Pros and Cons:
-
Bone Meal:
-
Pro: Feeds the plant slowly all season. Great for bulb size. Organic.
-
Con: More expensive than lime.
-
-
Gypsum:
-
Pro: Works fast. Adds Sulfur (flavor). Doesn't change your soil's pH.
-
Con: Need to apply it every year.
-
Enhanced Growth and Stress Mitigation
Studies have demonstrated that preharvest calcium application, often combined with other amendments, can significantly improve storability by reducing weight loss and decay of garlic bulbs during the storage period.
-
In controlled experiments, calcium played a role in mitigating cadmium stress in garlic seedlings, helping the plants maintain better chlorophyll content, net photosynthetic rate, and overall growth.
-
Another study found that amending saline soils with calcium sources helped reduce soil salinity and improved both nutrient uptake and overall garlic yields.
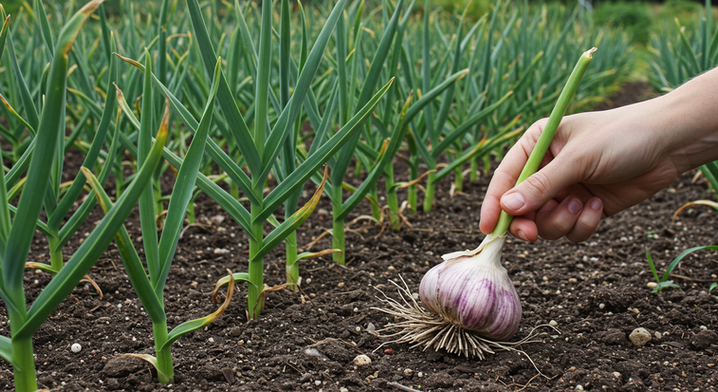
Spotting the Boo-Boos: Signs of Calcium Deficiency in Garlic
Since calcium is immobile, deficiency symptoms appear not on the old leaves, but on the newest growth. These are the tell-tale signs that your garlic needs an assist from the "Fixer":
-
Stunted or Distorted New Growth: The tips of the newest leaves may appear hooked, curled, or fail to unfurl completely.
-
Tip Burn and Necrosis: New leaves develop brown or black tips (tip burn). This necrosis occurs suddenly, often without prior yellowing.
-
Overall Weakness: The entire plant may appear smaller and less vigorous than its healthy neighbors.
-
Poor Bulb Formation: In severe cases, the bulbs may be soft, small, and more prone to post-harvest decay.
Why Soil Testing is Your Best Friend: Don't Guess, Test!
The most powerful tool a garlic gardener owns is a soil test. Don't guess, test!
Rushing to add calcium without a confirmed deficiency is a classic gardening "boo-boo." Too much calcium can raise your pH too high, making other essential micronutrients (like iron and manganese) unavailable, thus creating new deficiencies.
-
The Scientific Snapshot: A soil test provides a precise reading of your soil’s pH and existing levels of macro- and micronutrients, including calcium.
-
The Prescription: Labs provide recommendations tailored to your crop, ensuring you apply just what is needed to bring your soil into the optimal range for Allium sativum (pH 6.0-7.5).
-
The Guardrail: A soil test ensures you are not confusing a calcium deficiency with another issue, like heat stress or over-fertilization, saving you time, money, and your harvest. Test your soil every 1–3 years to maintain a balanced, high-yielding garlic patch.
Amending Your Soil: Practical Ways to Boost Calcium
If your soil test confirms a calcium deficiency, these amendments are your go-to "fixers":
-
Gypsum (Calcium Sulfate): Ideal for neutral or slightly acidic soils. It adds calcium and sulfur (another macronutrient vital for garlic's pungent flavor) without significantly altering the soil pH.
-
Lime (Calcium Carbonate or Dolomitic Lime): The go-to if your pH is low (acidic). Lime raises the pH while simultaneously supplying calcium. Use with caution and according to soil test recommendations, as over-liming is detrimental.
-
Bone Meal: A fantastic, slow-release, organic source of calcium and phosphorus. Mix into beds before planting your fall garlic.
-
Composted Manure or Worm Castings: These organic options gradually introduce bioavailable calcium (and many other nutrients) while improving soil structure.
The Golden Rule: Always incorporate amendments in the fall, before planting your garlic cloves, allowing them time to break down and become available to the roots.
Empower Your Garlic Garden with Calcium Wisdom
Calcium truly is the silent powerhouse, the "Fixer of All Boo-Boos," that moves beyond a simple nutrient to function as a plant's main structural support and its internal defense signaling system. For your Allium sativum crop, it is the key to strong, resilient leaves, defense against dreaded rot, and firm, beautiful bulbs that store well through the winter. By prioritizing a soil test, you trade guesswork for scientific precision, fostering a thriving, balanced garden.
Calcium's Role in Managing Garlic White Rot
Research into integrated pest management strategies for garlic diseases has included the application of calcium, typically as calcium nitrate (Ca(NO3)2):
-
Integrated Management Studies: Studies evaluating various treatments for White Rot, including biological agents and chemicals, have also assessed the effect of applying calcium nitrate (Ca).
-
Reduced Disease Incidence: In some integrated management trials, treatments that included calcium (along with other measures like Trichoderma harzianum and vegetable extracts) were associated with:
-
A lower disease incidence of White Rot.
-
A higher yield compared to control groups.
-
A reduction in the viable sclerotia (the dormant, survival structures of the fungus) in the soil.
-
-
Synergistic Effect: The benefits of calcium appear to be most significant when used as part of an integrated management strategy, often in combination with biological controls or other soil amendments.
While calcium is a vital nutrient for overall plant health, its primary documented effect as a disease management tool in garlic is its inclusion in control programs targeting White Rot. Garlic white rot is a serious soil-borne fungal disease, and the role of calcium application is primarily related to overall soil health and plant vigor, rather than being a direct treatment for the fungus itself. While increasing calcium levels can help ensure strong plant cell walls and overall plant health, which may increase tolerance to some diseases, the most effective control methods for white rot involve sanitation, crop rotation, and biostimulation (tricking the fungus to germinate and die).
Calcium Application for Garlic
Garlic benefits from adequate calcium, which is important for strong root and bulb development. If a soil test indicates a calcium deficiency or low pH (garlic prefers a slightly acidic to neutral pH of 6.0−7.0), you can apply calcium amendments.
-
Forms of Calcium:
-
Bone Meal: A slow-release organic source of phosphorus and calcium. It is applied at planting time to provide a steady supply throughout the growing season.
-
Ground Eggshells: Another slow-release organic option for adding calcium.
-
Lime (calcium carbonate, dolomitic lime): Primarily used to raise soil pH and also supplies calcium. Use this only if your soil pH is low, as garlic does not tolerate highly alkaline soil.
-
Gypsum (calcium sulfate): Supplies calcium without significantly affecting pH. Use this if your soil pH is already at a good level.
-
-
Timing: Apply the calcium-containing amendment, such as bone meal, to the planting rows in the fall when you plant your garlic cloves.
Primary White Rot Control Methods
Calcium is an important nutrient, but it's not a specific treatment for white rot. Since the disease is caused by long-lived fungal structures (sclerotia) in the soil, the most effective strategies focus on avoidance and reducing the pathogen's population.
1. Sanitation and Prevention (Most Crucial)
-
Use Clean Seed: Never plant cloves from a bulb that was harvested from a white rot-infected area. Buy certified disease-free seed garlic.
-
Quarantine: If an area is infected, avoid planting any Allium crops (garlic, onions, leeks, shallots, chives) in that spot for at least 4 to 6 years, and preferably 8-20 years, as the sclerotia can survive for a very long time.
-
Sanitation: Clean all tools, boots, and equipment after working in an infected area to prevent spreading the sclerotia to other parts of your garden. Do not compost infected plant material.
-
Drainage: Plant in well-drained soil or raised beds, as white rot thrives in wet, heavy conditions.
2. Biostimulation ("Suicide Germination")
This is one of the most promising organic methods for reducing the fungal population in infested soil before planting.
-
Mechanism: White rot sclerotia are stimulated to germinate by allicin, a chemical exudate from Allium plants. If they germinate and find no host plant, they die, thus reducing the pathogen's load in the soil.
-
Application: Apply garlic powder or garlic juice solution to the infected soil when you are not growing any Alliums in that bed.
-
Timing: Apply when soil temperatures are optimal for sclerotia germination (ideally between 50∘F and 72∘F or 10∘C and 22∘C), which is typically in the late summer or early fall before you would normally plant garlic. Rake the powder or water the solution into the soil, and avoid planting for a full season afterward.
3. Solarization
Process: During the hottest part of the summer, water the soil and cover it with a clear plastic sheet for about 4-6 weeks. This raises the soil temperature, which can kill a high percentage of the sclerotia.
Example Applications:
100 square feet. How Much to Use: 5 to 10 pounds of bone meal.
This provides the necessary slow-release Phosphorus (P) and Calcium (Ca) for root development. However, remember the critical application notes:
-
Soil Test First: Always perform a soil test, as too much phosphorus can cause nutrient lock-out.
-
Mix It In: Incorporate the 5 to 10 pounds of bone meal thoroughly into the top 3 to 6 inches of soil.
-
When to Apply: Apply it pre-planting (late summer/early fall).